Welcome to Part 4 of our War Commander 101 tutorial series! If you have not yet read Part 1, Part 2, and Part 3, you might want to do that before reading this. But hey, if you like learning things backwards, that's your business! We're not telling you how to live, man.
The focus on this article is base defense. We're not going into delve into the strategic details of base defense, or tell you exactly what units to use for what purposes. You'll have to figure all of that out on your own, or ask for input from the player community via the forums and our Discord channel. (There are so many variables in the game that any attempt to explain every possible base defense strategy would be impossible.) Instead this article focuses on the basic concepts of base defense so you'll have a general sense of how to protect your base when you're away.
Before we go on, though, we do want to warn you about one thing. No matter how well it's defended, your base is going to take damage from attacks. This is just part of the game! You will never be able to protect your base from taking any damage. For every defense there is a tactical workaround, and just as it has in real world military history, defensive technology tends to trail a bit behind offensive technology: It's easier to make a weapon with serious firepower than it is to develop an effective defense against that weapon.
War Commander is a wargame, and wargames mean battle, and battle means repairs. You will always be refining your base defense strategy; as the game adds new content, you might find you revise or even completely redesign your base layout.
Welcome to the never-ending battle, commander. Be prepared!
Base Defenders Platoon
Your base allows you to create a platoon specifically for the purpose of base defense. These Base Defenders will deploy automatically when your base is attacked and will fight to the death to defend it. You only have one base defense platoon, so your Base Defenders will often be outnumbered by invading forces, but you'll also have the benefit of your defensive structures, so the Base Defenders aren't your sole line of defense.
To add units to your Base Defenders platoon, simply click on your Storage building and look for the Open button.
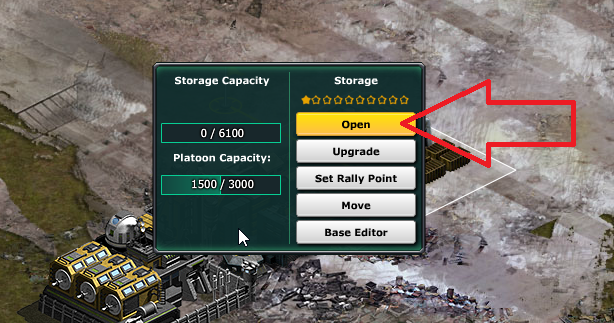
This brings up the Platoons window:
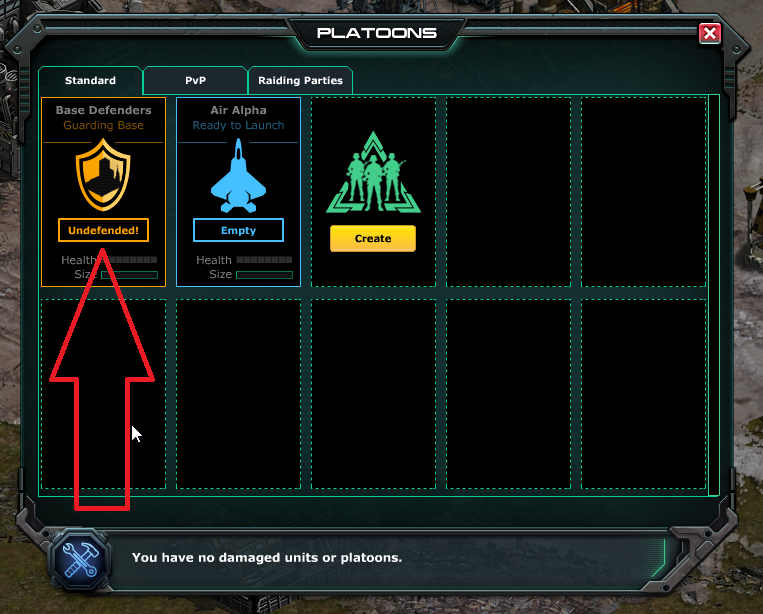
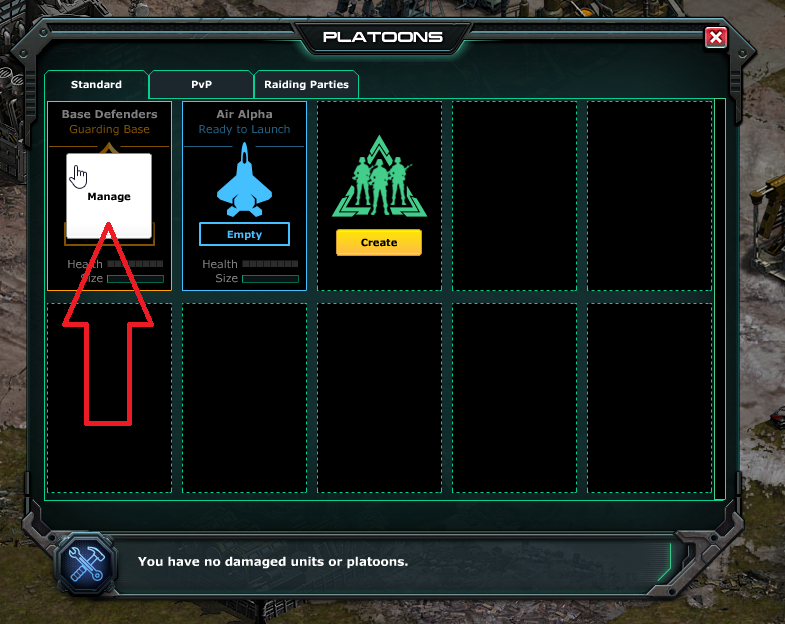
Your Base Defenders platoon is over there on the left. Currently it's empty, so the game tells us our base is undefended. We need to add some units to that platoon, so click on it. You will then see the option to Manage the platoon. Click on that option (seen below).
Now you should see this window, which shows you all the units you currently have in Storage that are eligible to be added to your Base Defenders platoon (not all units can perform all duties).
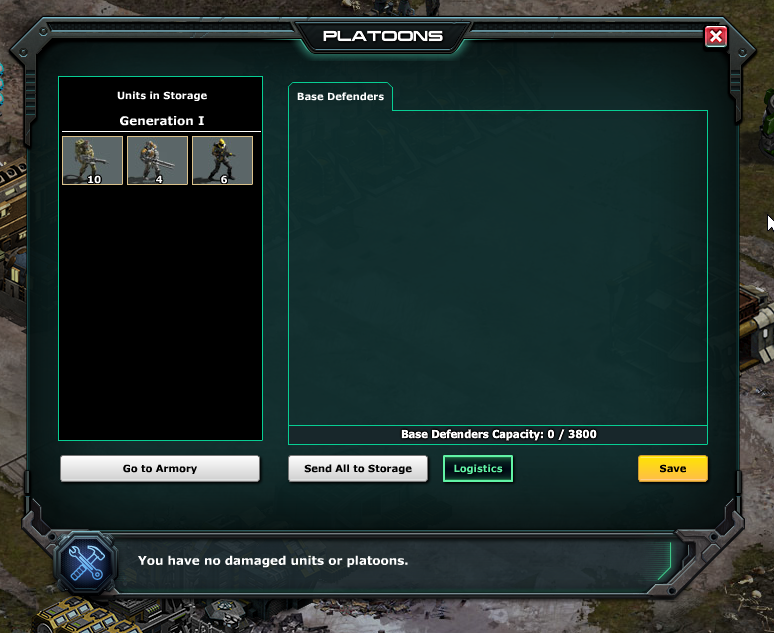
Click on a unit type to add a unit to the Base Defenders. Each time you hit that green arrow, it will add a unit of that type to your platoon (until you run out of that unit type or reach your platoon's capacity, anyway).
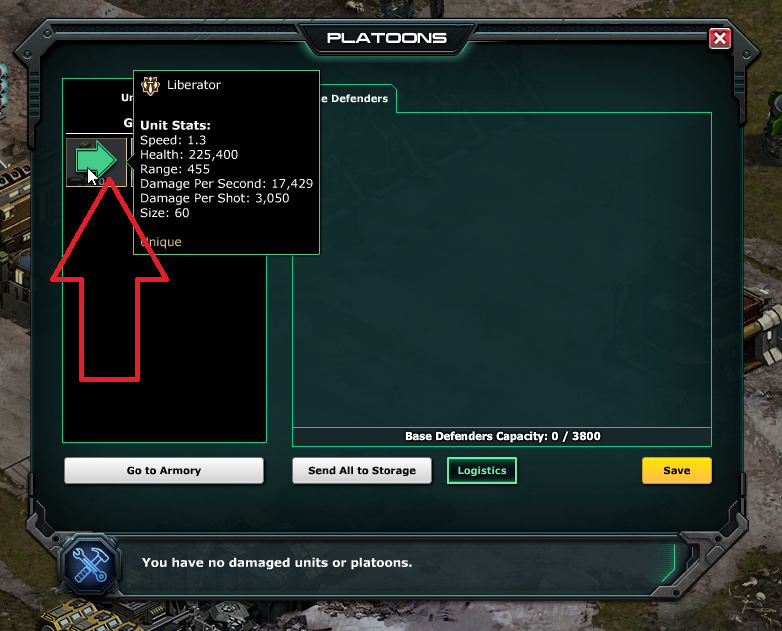
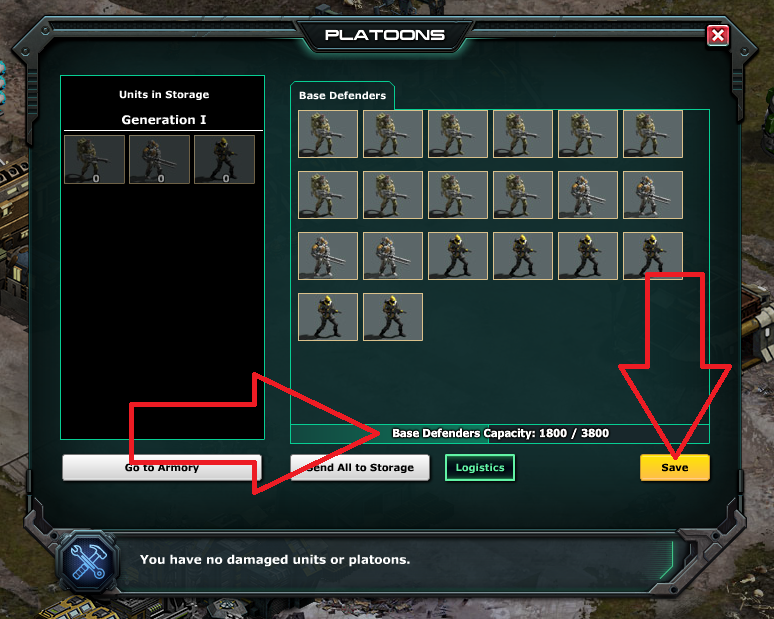
As you add units to your platoon, keep an eye on the capacity of your Base Defenders platoon (it's there towards the bottom of the window, as indicated by the left arrow in the screenshot below). Each unit in the game has a size value; you can put any combination of eligible units into your platoon, but the platoon's size is limited by its capacity. The capacity of your Base Defenders platoon increases as you level up your Command Center:
| Command Center level | 1 | 2 | 3 | 4 | 5 | 6 | 7 and up |
| Base Defenders platoon capacity | 500 | 640 | 1025 | 1640 | 2600 | 3200 | 3800 |
Once you are satisfied with the composition of your Base Defenders platoon, click that Save button. You're ready to defend your base!
Some units in the game are better suited to defensive duty than others. Over time you will definitely want to research some of these specialized units for use in base defense; they will add greatly to your defensive firepower and make your base a much harder target.
Another way to harden your base defense is to upgrade your Defense Lab. Your Defense Lab lets you research lots of cool defensive turrets (more on that later...), but from level 11 onward, it also reduces the amount of damage your Base Defenders take in combat! The Defense Lab reduces damage taken by the Base Defenders a fixed percentage based on the Defense Lab's current level. This reduction is not cumulative per level; this table shows you the total damage reduction as determined by the Defense Lab's level.
| Defense Lab level | 1-10 | 11 | 12 | 13 | 14 | 15-17 | 18-19 | 20 and up |
| Base Defenders defensive damage reduction | 0% | 10% | 15% | 16% | 17% | 18% | 19% | 20% |
The Go-Go Bar (which we'll discuss later in this article) also provides a couple buffs for your Base Defenders. Depending on its level, the Go-Go Bar increases the amount of damage done to attackers by your Base Defenders, and reduces the amount of time it takes to repair them. As above, these bonuses are not cumulative; the number shown here is the total bonus at the indicated level.
| Go-Go Bar level | 1 | 2 | 3 | 4 | 5 | 6 | 7 | 8 | 9 | 10 | 11 | 12 | 13 | 14 | 15 | 16 | 17 | 18 | 19 | 20 and up |
| Base Defenders attack damage bonus | 4% | 6% | 8% | 12% | 18% | 24% | 30% | 36% | 42% | 48% | 48% | 48% | 48% | 48% | 48% | 48% | 48% | 48% | 48% | 48% |
| Base Defenders repair time reduction | 1% | 2% | 3% | 4% | 5% | 7% | 9% | 11% | 13% | 15% | 18% | 21% | 24% | 27% | 30% | 34% | 38% | 42% | 46% | 50% |
You are allowed only one Base Defenders platoon, but there are other ways to aid in the defense of your base...
Command Center Turrets
Ah, the good ol' Command Center. This building has your back, yo! Its upgrades unlock all kinds of other upgrades, it stores resources, and once it gets to level 7, it can play an active role in base defense, too! From level 7 and onward, the Command Center can be equipped with one of a variety of special Command Turrets. These turrets can only be placed on the Command Center; only one Command Turret at a time can be mounted on the Command Center.
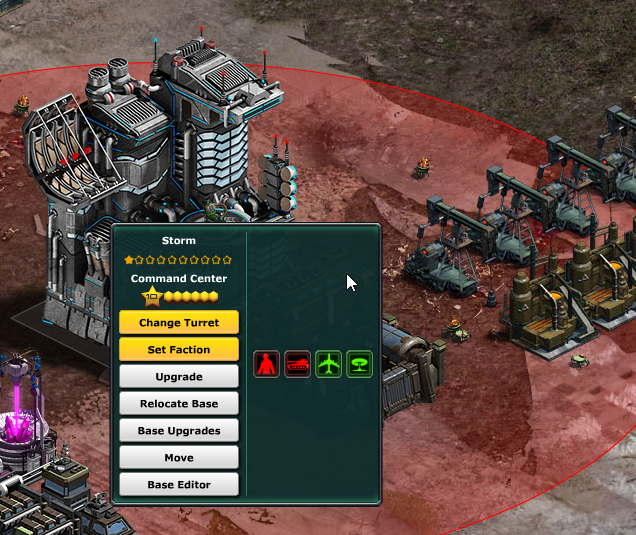
To set a turret on your Command Center, just click on the Command Center and look for the Set Turret button. Click it!
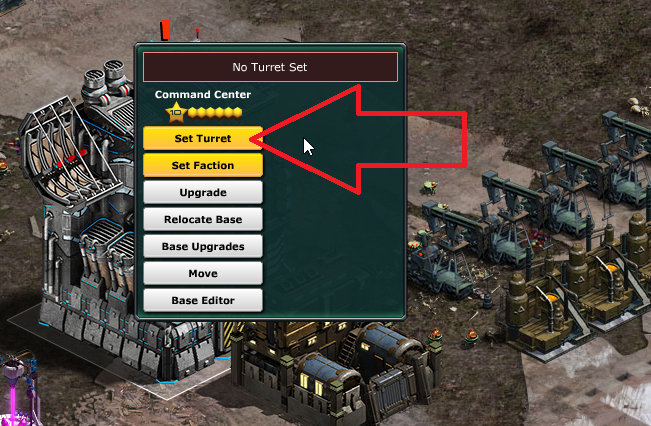
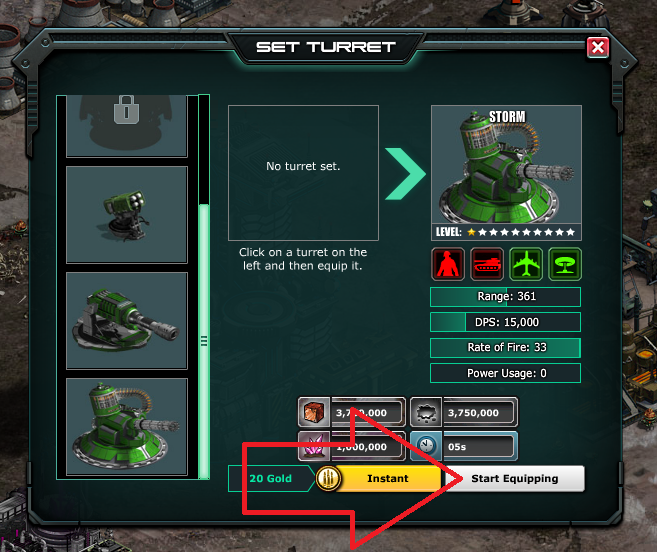
This brings up the Set Turret window, where you'll see the various turret types you have unlocked (level up your Defense Lab to access these options). In this example, we're selecting the Storm turret...
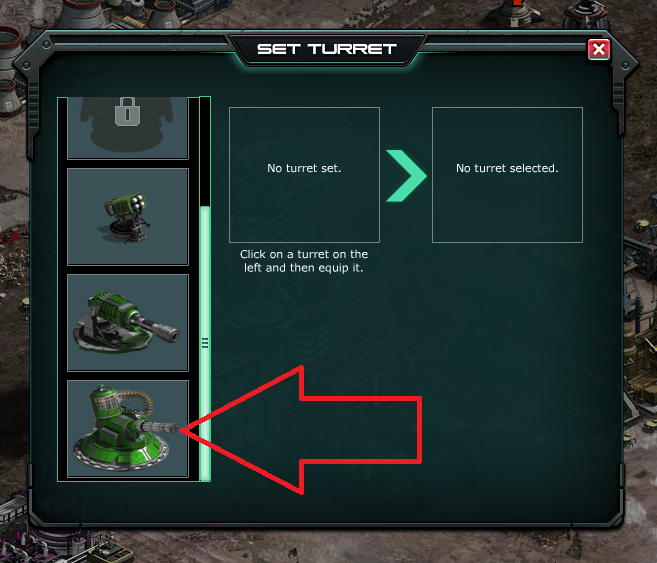
Once we've clicked on the turret we want, it will show up in the window on the right. Click Start Equipping to spend your resources (or, if you're in a rush, coin it).
Now we can click on our Command Center and see that it has a Storm turret equipped, and we can even see the range of the turret--that's what that red circle is!
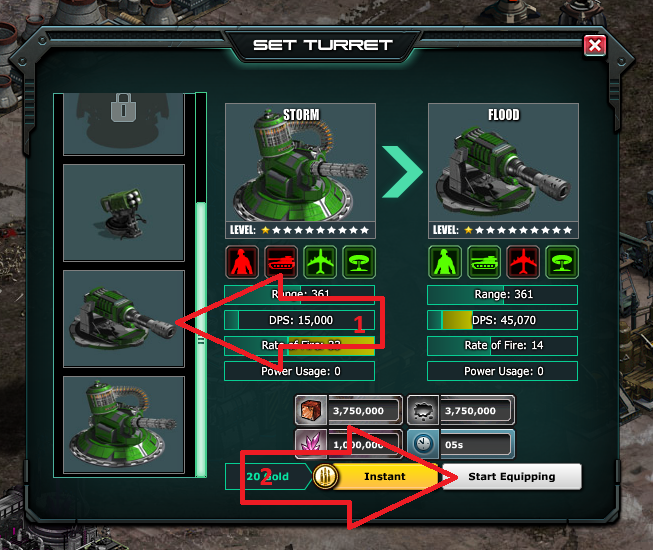
You can change command turrets anytime you like as long as you meet the costs. To change your current type, just access the Set Turret menu again, and select your new turret type (step 1). Then equip it (step 2). It doesn't get any easier!
War Production
War Production allows you to keep adding to your defensive forces while you're repelling an attack. This isn't an ability you'll have right away, and there are limitations as to what units can be produced, but once you've unlocked it, War Production is a great way to strengthen your base's defense. Once War Production is available, certain buildings in your base can be set to build units that will automatically deploy while you are under attack to reinforce your defense efforts. TLDR version: It's really cool.
At this time, only the Barracks, War Factory, and Airfield are capable of War Production. They first acquire this ability at specific levels:
| Building | Gains War Production at level... |
| Barracks | 16 |
| War Factory | 21 |
| Airfield | 31 |
When War Production is active in a building, that building will produce a new unit of a specific type every 20 seconds (infantry) or 30 seconds (vehicles and aircraft) while your base is under attack. If the building is destroyed during battle, it will cease War Production.
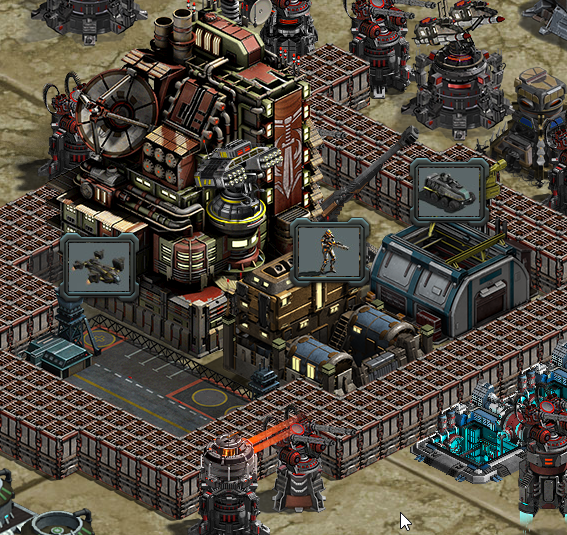
We're using a different base for our pics in this section, since the base we've been using for these tutorials isn't ready for War Production yet. In this base, we can see from the unit icons floating over the Barracks and the War Factory that those buildings have War Production activated (the two arrows on the right).
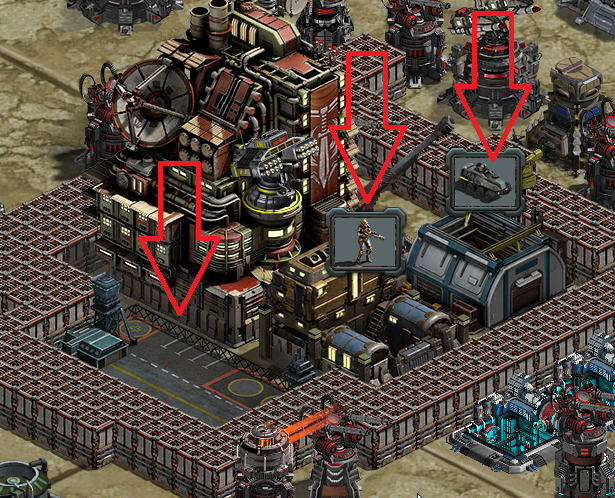
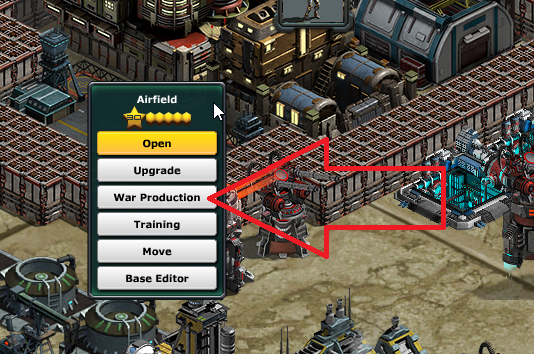
The icons represent the unit types they'll produce while this base is under attack. The Airfield (the arrow on the left) hasn't had War production activated yet, so let's do it!
Click the Airfield and look for the War Production button.
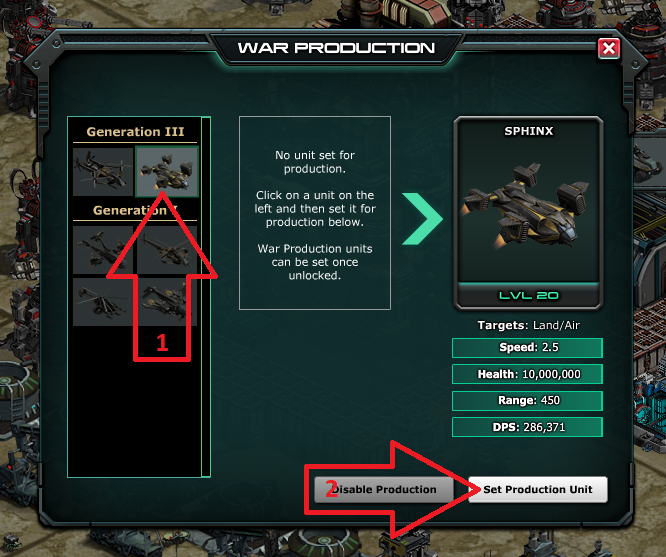
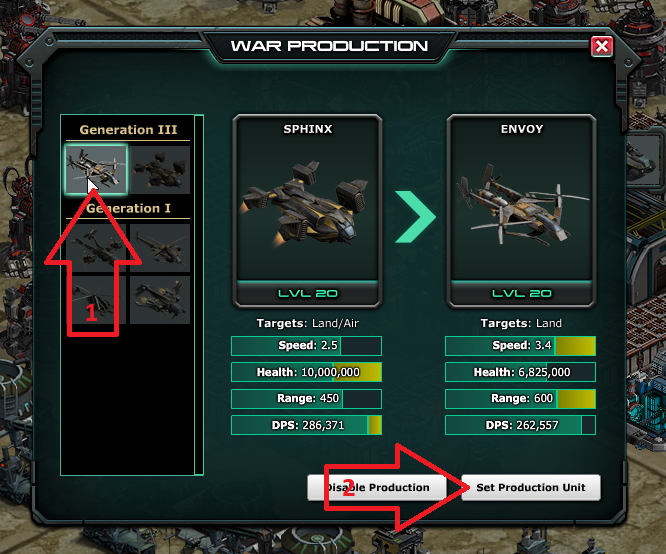
Once you click the War Production button, you will see this screen, where you'll be able to select what unit type is going into War Production. We've decided we want to produce Sphinxes during battle, so we've clicked on the unit in the selection menu on the left (step 1), then to set production, we'll click on the Set Production Unit button (step 2).
Once we've done this, we'll see a unit icon floating over the Airfield, just like we see for the Barracks and the War Factory. Congratulations, commander--War Production is in full swing!
The number of unit types you have available for War Production will increase as you level up the building in question. Units spawned by War Production do not cost you anything to produce, and are spawned at whatever level you've upgraded that unit type to at the time of the attack. If you have not yet unlocked that unit type in your base but it is unlocked for War Production, it will spawn at level 1.
Units created by War Production vanish mysteriously after the end of battle. Perhaps, weary of war, they hang up their armor and retire to the hall of celebrated veterans. (In other words, no, you can't keep 'em.) When first spawned the units will aggressively attack the nearest enemy unit, but you are able to control them along with your other units.
If you decide you want to change the unit type you have selected for War Production, just repeat the steps for setting War Production until you see the current unit selected:
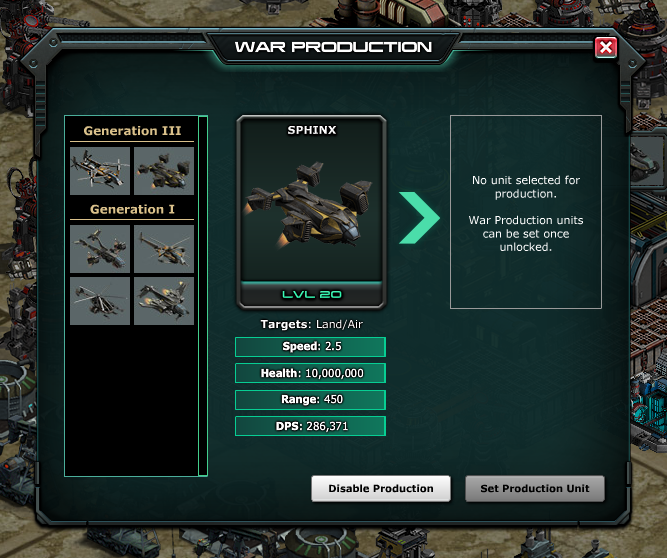
Then, click the unit type you want to produce instead (step 1). This will auto-fill the window showing what unit is to be produced. Once you're settled on your decision, hit the Set Production Unit button (step 2).
Last Stand Defenders
Last Stand Defenders (sometimes abbreviated as LSD) are infantry units that spawn from most of the game's buildings as those buildings are destroyed in battle. These units are not the strongest, but they do contribute to your base's defense: once a building is destroyed, the units will deploy automatically. You will not be able to give them orders. Your Academy determines their level, and the number of units spawned from a destroyed building is determined by the building's type and level. (Some game effects can prevent LSD from spawning at all, but those are topics for another time.)
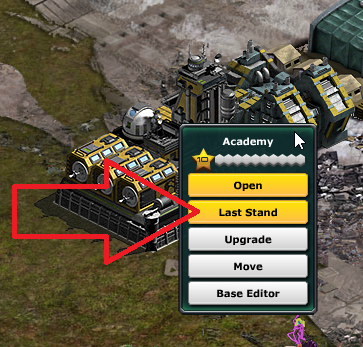
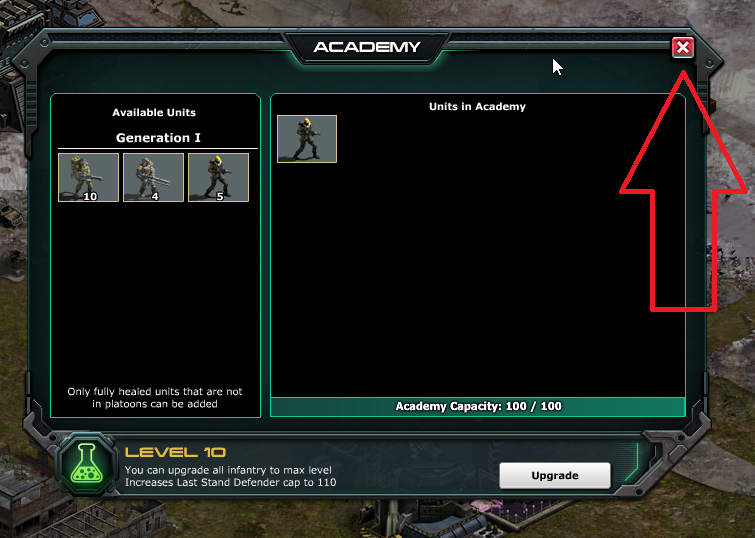
Honestly, LSD are unlikely to be a big part of your base defense, since they kind of happen without you having to do much. However, in your Academy and Tech Center, you can customize your Last Stand Defenders, and you have more powerful unit options when doing so. The units you place in these buildings have to be constructed; once built, you can stash them away inside these buildings, where they wait for their chance to strike. To add custom LSD to your Academy or Tech Center, just click on the building and look for the Last Stand button:
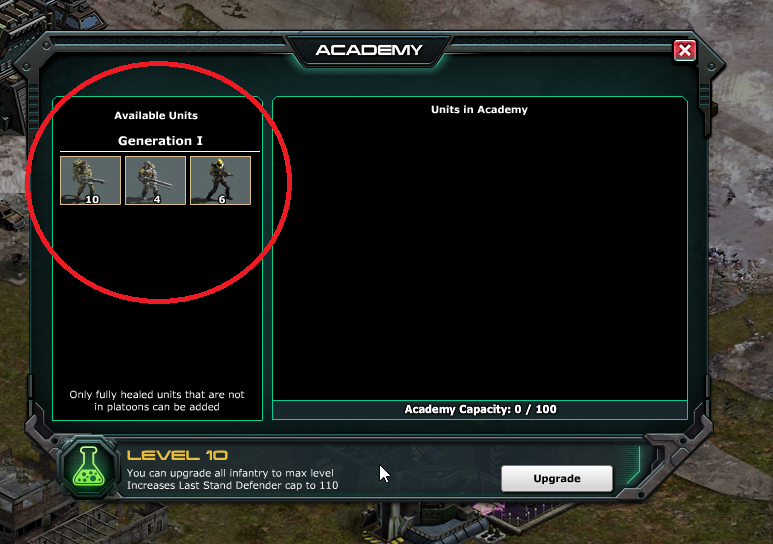
Once you've clicked on the Last Stand option, you'll see a window showing you any units eligible for Last Stand duty in your Storage. Only fully healed units that are not currently assigned to any platoons (including your Base Defenders) are eligible. In the Academy, only infantry can serve as Last Stand Defenders; in the Tech Center, this honor falls to the game's vehicles.
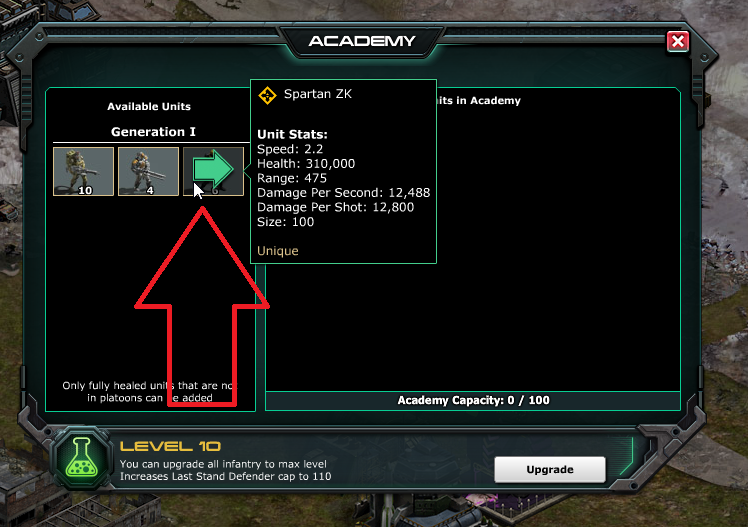
To place a unit into the building you want it to avenge upon its destruction, just click on the unit...
...and you'll see it added to the building's Last Stand reserve. When you're satisfied with the units you've assigned to this role, just close the window.
Go-Go Bar
In addition to the damage and repair buffs it provides your Base Defenders platoon (we talked about that a few topics ago), the Go-Go Bar gives you the chance to test your base defenses in simulated combat. Because you can run as many of these simulations as you like without doing any actual damage to your base (there are no repair costs), this is one of your best tools for figuring out how various defenses interact with different types of attacker.
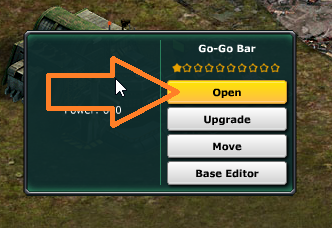
To use the Go-Go Bar, click on it and look for the Open button.
A window will appear that gives you all the options for testing your defenses.
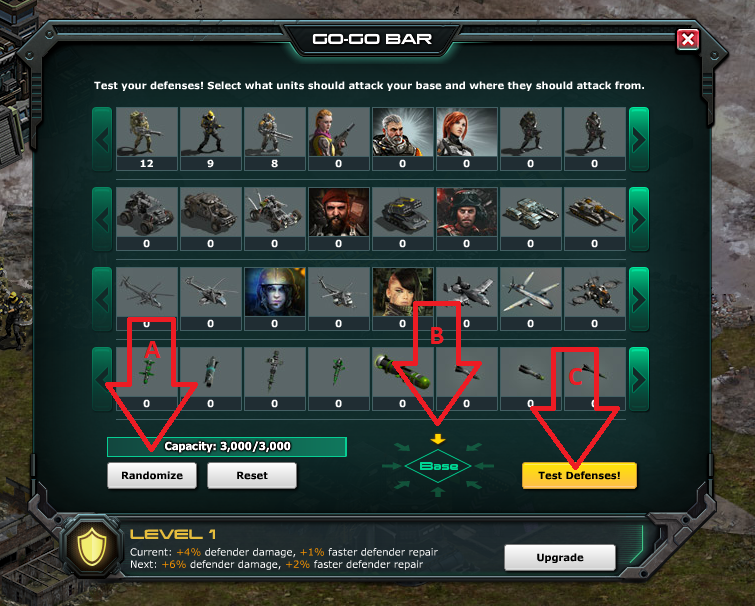
What you are doing in this window is building a platoon that will attack your base from a specific direction. You can either click on the individual unit types to add them to the attacking platoon (you can change the quantity of each unit as well), or you can use the Randomize button indicated by arrow A. Then, click on the direction you want the attackers to come from when they hit your base (arrow B); this can also be randomized. Finally, when you're ready to run your simulation, hit the Test Defenses button (C).
You'll then see a brief countdown, and the simulated battle will begin! You can control your Base Defenders manually, or you can use the game's AI RUBI to set their defensive or offensive posture and watch them just do their thing. The battle will run until the attackers have destroyed your base or have been destroyed themselves; you can also stop the simulation at any time by using the Stop feature (see arrow B below).
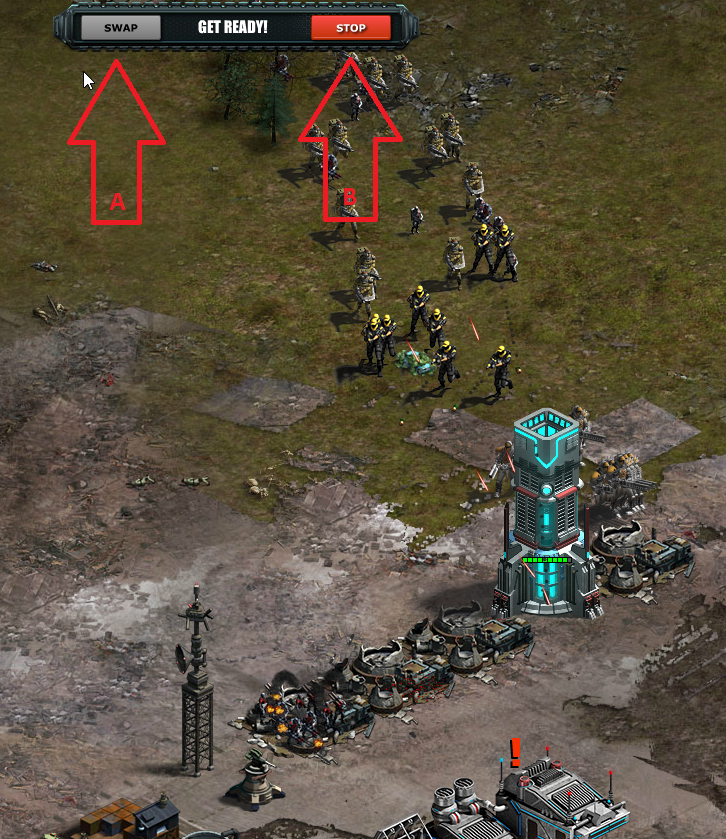
When your Go-Go Bar reaches level 21, you will be able to use that Swap arrow (A) to toggle control between your Base Defenders and the attacker; this makes it even easier to test specific strategies and attack vectors.
Damage Protection
Damage Protection, also known as a "bubble," is an impenetrable force field that forms around your base when it takes significant damage from a PvP attack. Unlike all the preparations we've talked about in this article, Damage Protection is completely automatic--when applicable, it turns itself on or off. As long as Damage Protection is active, your base may not be attacked. (Any deposits or platoons you control on the World Map may still be attacked, though.) Damage Protection is visible to all players; when you're looking at a bubbled base, the bubble will be a different color depending on your relationship with that player. For example:

Your Base will appear blue when you view it on the world map, your friends' bases will appear green, and your enemies' bases have red bubbles. Rogue faction bases (bases not controlled by players) will have orange bubbles.
Damage Protection is temporary. You can check how much time remains on your Damage Protection by entering your base and looking in the upper right corner of the HUD. (The timer will not appear here if you do not currently have Damage Protection.)

New bases automatically receive 7 days of Damage Protection. This gives you time to get your base established before having to repel enemies. This is the only instance in which Damage Protection is not caused by battle.
The rest of the time, the duration of the Damage Protection your base receives is determined by the amount of damage dealt to your base's buildings (units and barricades do not count) in the attack.
| Damage inflicted on base by attack | Duration of Damage Protection |
| Less than 50% damage | None |
| Between 50% and 75% damage | 18 hours |
| Over 75% | 36 hours |
If the attacker does enough damage to trigger Damage Protection, Damage Protection is applied as soon as combat ends. (During our Warpath events, Damage Protection lasts only 4 hours. This is unique to the Warpath event type.)
The most mundane way to lose Damage Protection is by allowing the timer to expire. There is no way to extend Damage Protection, and the bubble goes away at the end of its time limit whether or not your base was fully repaired while under Damage Protection, so plan accordingly!
If a player under Damage Protection attacks another player's base, platoon, or deposit, their own Damage Protection will end early--and by early, we mean "right frakking now." Players refer to this as "popping" your bubble. Attempting to attack any of these target types will prompt a warning with the time remaining on the Damage Protection.

Just clicking "Attack" will shut down your Damage Protection regardless of the outcome or the quantity of platoons deployed in the fight (even if change your mind after clicking "Attack" and deploy no platoons!), so don't click that "Attack" button unless you're ready to go!
Attacking a Rogue base or an Event base will not end Damage Protection. As long as you're not attacking another player's assets, your Damage Protection will count down normally.
If you end your own Damage Protection by attacking another player's assets, it will not reactivate for 10 minutes. This means that if you pop your own bubble, you can hypothetically be attacked by multiple opponents during that cooldown period. This is not a malfunction, and not something about which to contact support. If it happens, you brought it upon yourself when you popped that bubble, commander. As the old adage goes, you reap what you sow! And on the battlefield, we sow mayhem and destruction.
Sweet, sweet mayhem and destruction.
Bunkers/Watchtowers/Strongholds
Once your Command Center is level 3 and your Barracks is level 2, you are able to build Bunkers. Bunkers are defensive structures that can be filled with infantry units; the structure offers protection to these units, who will join in your base defense. Units stored in a Bunker have improved range and damage against both air and ground units.
When you first build a Bunker, it will look like this:

To place units inside a Bunker, just click on the Bunker and look for the Open option:
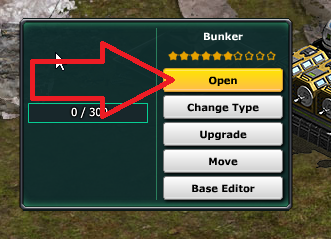
This will bring up a screen that shows you all the units you have in Storage who are eligible for Bunker duty. (Only infantry can fight from a Bunker, only fully healed units that are not currently in platoons may be assigned to the Bunker, and Hero units cannot be placed in Bunkers.)
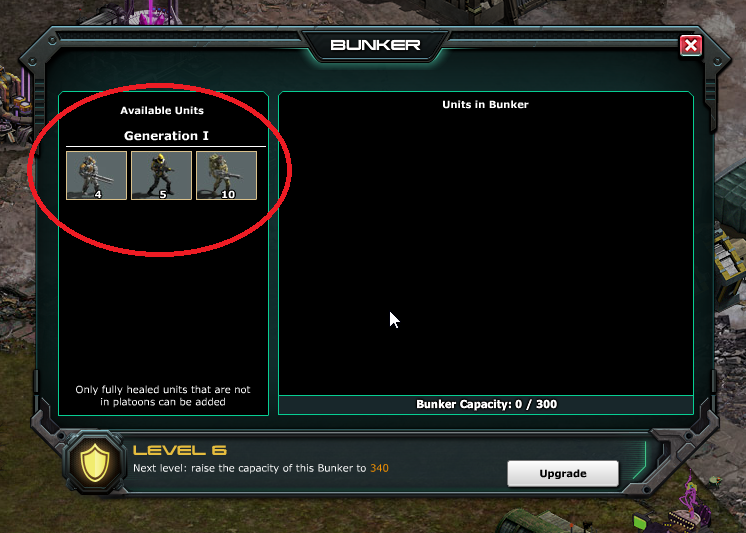
To move a unit from Storage to the Bunker, just click on the unit...
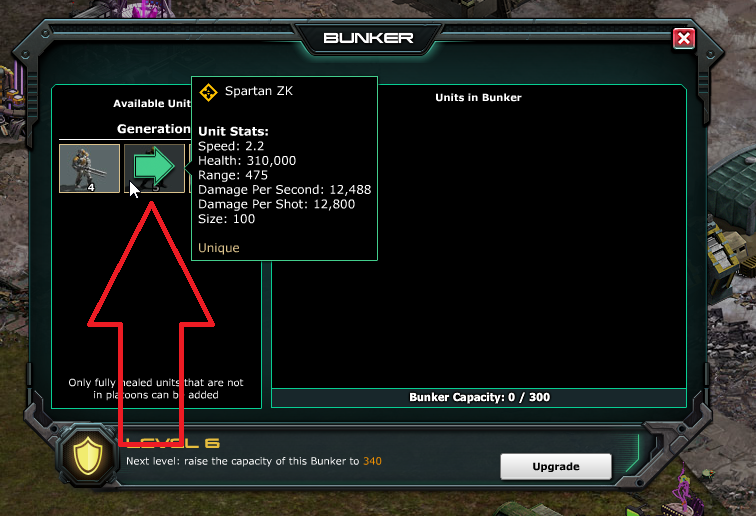
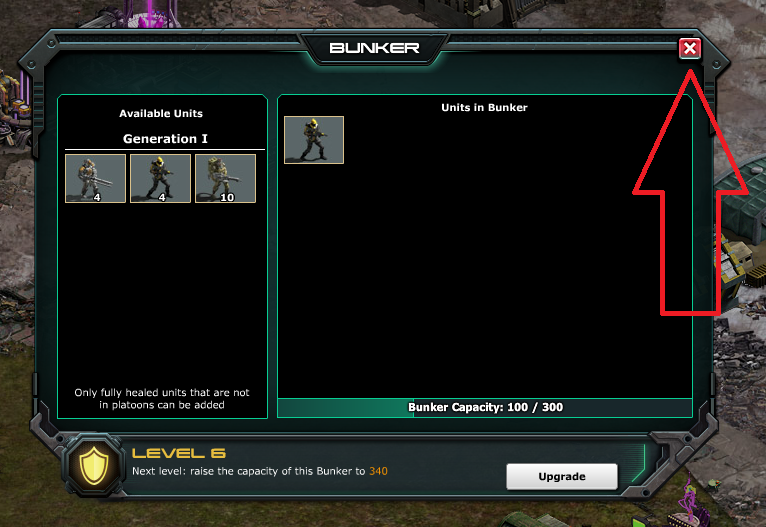
...and you'll see it move into the Bunker. (Level up your Bunkers to increase the number of units they'll hold; you'll see it's current capacity just under the "Units in Bunker" field of the Bunker popup.) Once you've placed the units you want placed, just close the window.
Bunkers can be replaced with more specialized troop emplacements: Strongholds and Watchtowers. Here's what they look like when you first build them (the Stronghold is on the left, the Watchtower in the right).

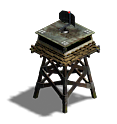
To use this option your Bunker must be at least level 2, your Command Center level 3, and your Barracks level 3. These specialized emplacements have advantages against specific unit types, whereas the Bunker has smaller advantages against all unit types. The Stronghold is more effective against ground units (infantry and vehicles), and the Watchtower is more effective against Here's a table that compares the various Bunkers' advantages at level 10, which is the level at which these bonuses are maxed out. We've highlighted each Bunker type's best qualities to give you a sense of how they're used, too:
| Bunker Type | Range Bonus | Damage Bonus vs. Aircraft | Damage Bonus vs. Vehicles | Damage Bonus vs. Infantry | Health |
| Basic | 40% | 20% | 20% | 20% | 450,000 |
| Stronghold | 40% | none | 40% | none | 750,000 |
| Watchtower | 50% | 40% | none | none | 300,000 |
The tactical advantages of each Bunker type are pretty obvious. Bunker types can be switched; they're not fixed once selected, so you can modify your Bunker strategy over time to meet emerging battlefield trends (War Commander adds new content all the time, which regularly changes the very face of combat!).
To change a Bunker's type, click on the building and click the Change Type button:
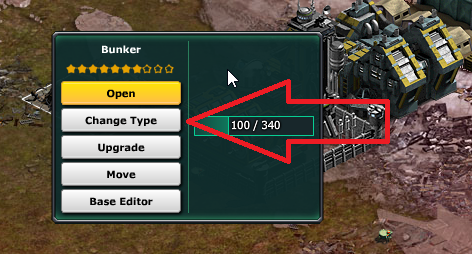
This brings up the Bunker window.
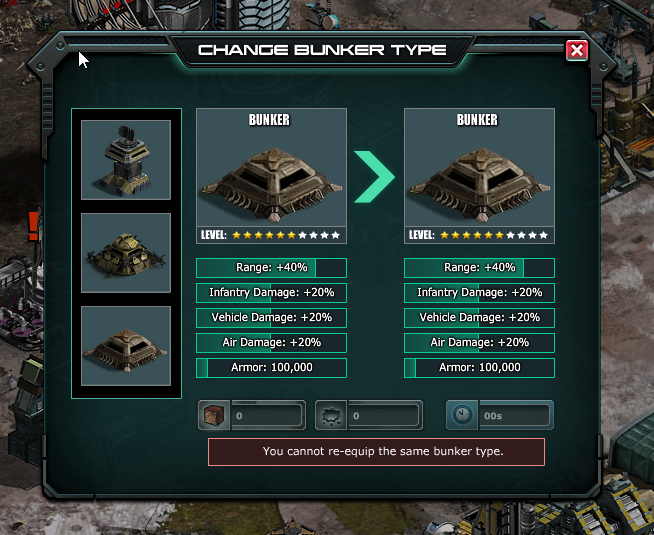
On the left side of this window, we see the three Bunker options. The rest of the window shows us the advantages and costs associated with switching Bunker types. When you open this window, it will show your current Bunker type in both fields; don't let this confuse you! All you need to do is click one of the other options, and it will populate the field. Click Use Resources to finish the process (or coin it):
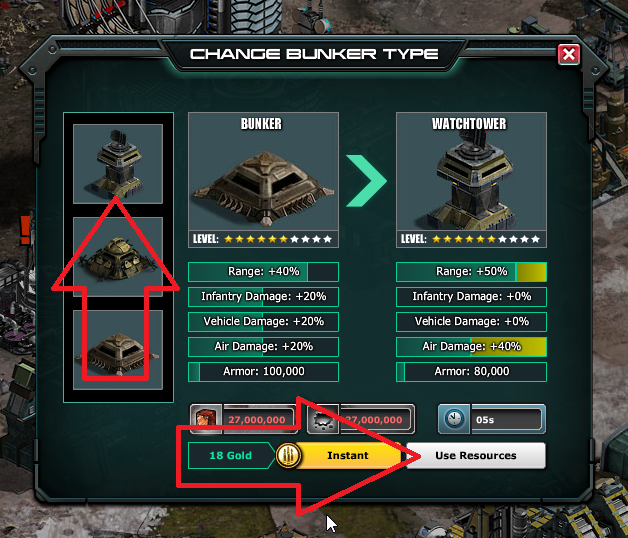
The process for loading Bunkers is the same for each Bunker type. Units in Bunkers do not count towards the capacity of your Base Defenders platoon; these defenders are doing their own thing. Units must be at full health to be placed in any kind of Bunker.
Hero units are not eligible for Bunker duty. Guess they're too cool for that.
Defense Platforms and Turrets
Ah, what's a wargame without towers that hurl fiery death at the enemy, amiright? War Commander fills this niche with a variety of Defense Platforms and Turrets.
Defense Platforms are towers onto which Turrets are mounted. Though they look like a single structure, continue thinking of them as separate things: the Platform is the building, and the Turret is the technology with which it's equipped. (They're kind of like your Command Center in that way.) This means that upgrading a Platform will not upgrade the Turret mounted on it.
When you upgrade a Platform, you are upgrading that specific individual Platform, not all Platforms of that type in your base. Each of your Platforms is its own building, and must be upgraded individually like every other building.
Turrets, on the other hand, are upgraded in the Defense Lab. Each Turret upgrade is applied to all your Turrets of that type, and each Turret of that type you mount on a Defense Platform thereafter will be of the highest level you have researched for that Turret at the time you attach it to a Platform.
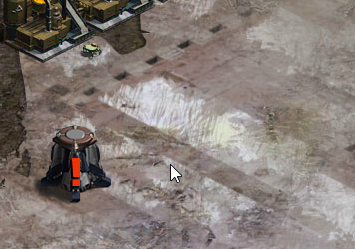
Once you have built a Defense Platform, you'll see an exclamation mark above it reminding you that it's not going to do anything without a Turret.
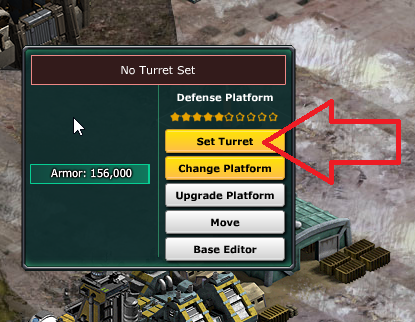
Click on the Defense Platform to open the building's options, then click the Set Turret button:
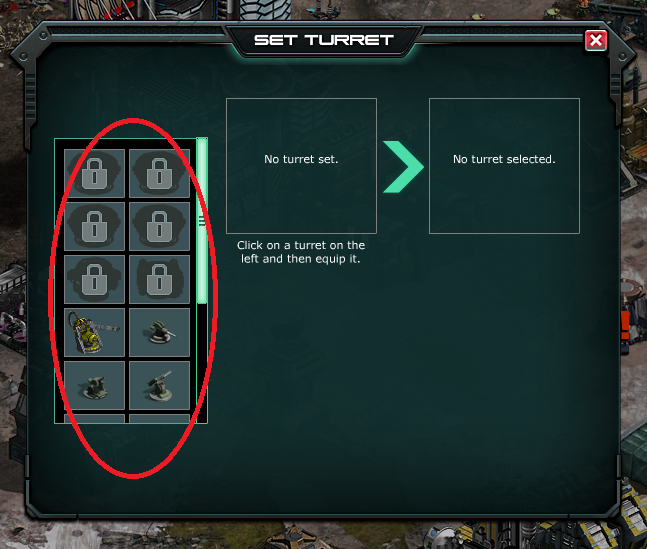
Welcome to the Set Turret menu! Now you'll be able to select a Turret. Your Turret options are on the left side of the window (you will unlock more over time).
Click the Turret you wish to set (1). Once you're settled on the Turret type, click Start Equipping (or coin it).
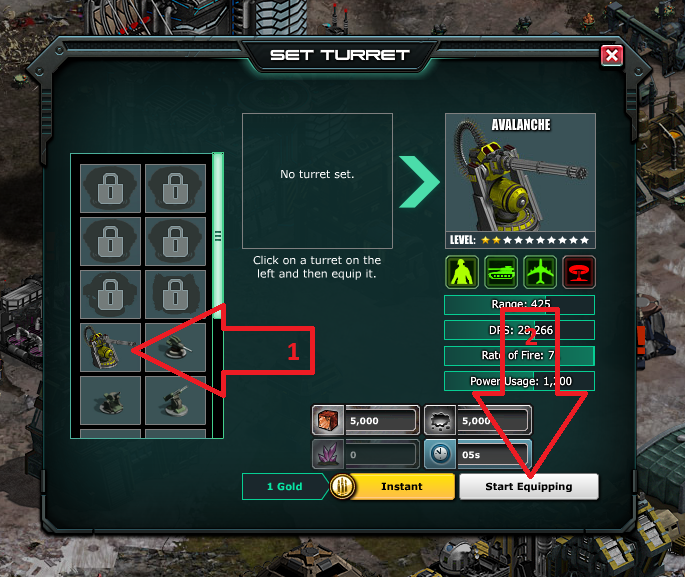
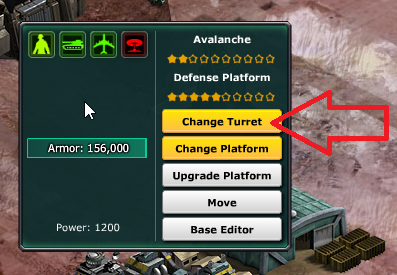
You change Turrets at any time simply by clicking on the Platform, then clicking the Change Turret button.
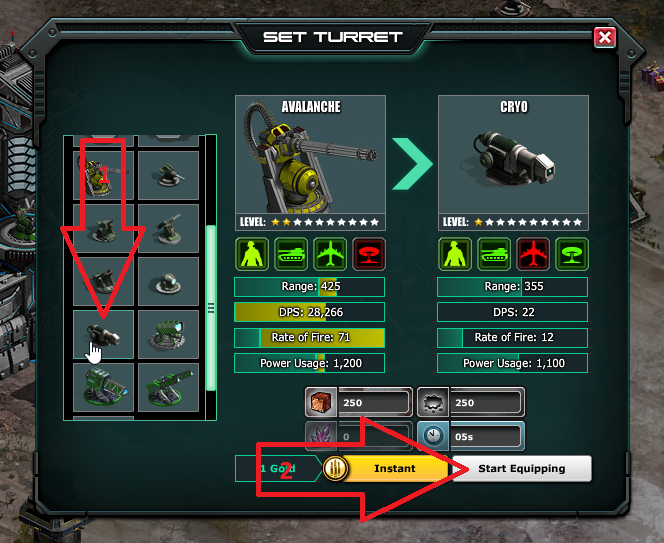
Then select your new Turret type (1) and Start Equipping (2) it to your Platform.
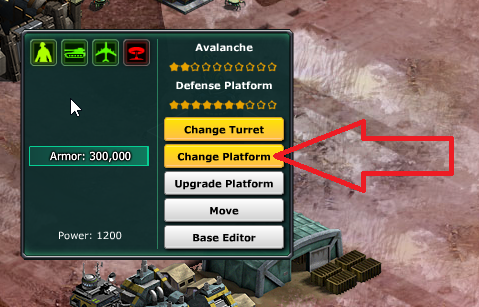
Defense Platforms can be switched between several variations (like Bunkers). Each variation has different advantages and disadvantages; those are explained pretty well in-game, but we'll show you how to make the switch. Just click on your Defense Platform and find the Change Platform button:
Your available Platform types are on the left. You will unlock more over time.
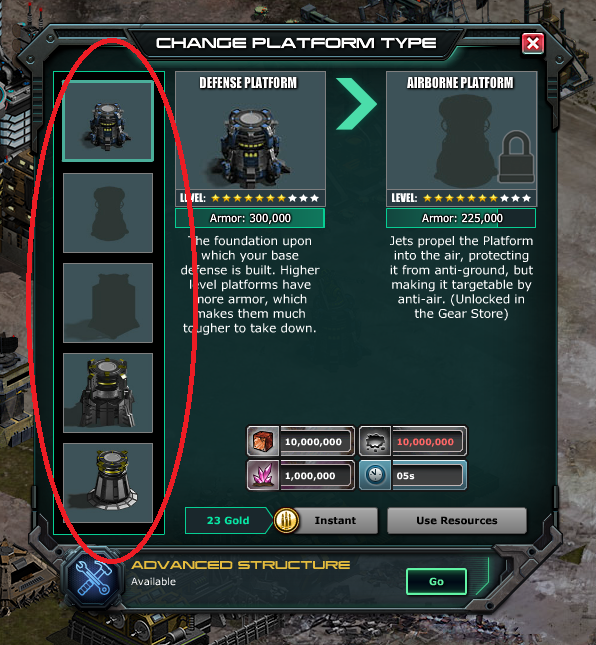
To make the switch, just click on the Platform type you want (1), then click Use Resources (2) or coin it to finish the job.
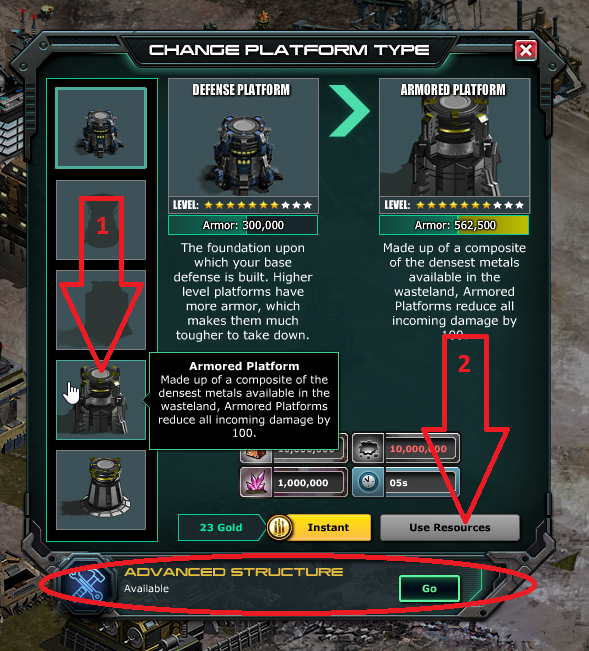
Note also that Defense Platforms can be turned into Advanced Structures, but switching to an Advanced Structure is a permanent change. You can switch between normal Defense Platform types, and you can switch between Advanced Structure types, but you cannot switch back to a Defense Platform type once you've transitioned the building into an Advanced Structure.
The game also has Heavy Platforms, which function in exactly the same way as Defense Platforms, but are much sturdier; unfortunately, you're not able to build as many of them as you are Defense Platforms. Heavy Platforms are not an upgraded form of the Defense Platform. They are their own structures and have their own variations, upgrades, and Turret types. Luckily, their interface for making these selections is identical to the one we've shown you here--only the options are different.
Many players use Barricades in conjunction with their Platforms and obstacles (more on obstacles in just a sec...) to restrict enemy movement and create "kill zones" through which advancing is a costly endeavor. Upgrade your Barricades to increase their durability. Barricades can be upgraded in individual blocks or as groups.
Obstacles
Sometimes, the best defensive option is the old fashioned, low-tech option.
The Low Wire Entanglement and Dragon's Teeth obstacles are designed to hinder enemy movement in your base. The Low Wire Entanglement greatly reduces the movement rate of infantry (and as we've said earlier in this series, if you've been through basic training, you already understand this all too well!), while Dragon's Teeth does the same against vehicles.
One nice thing about these obstacles is that they don't take up room inside your base's boundary. They can be placed immediately outside your base; as long as their footprint touches the boundary of your base, it's all good! (Press the "R" key on your keyboard to rotate the obstacle while placing it.)
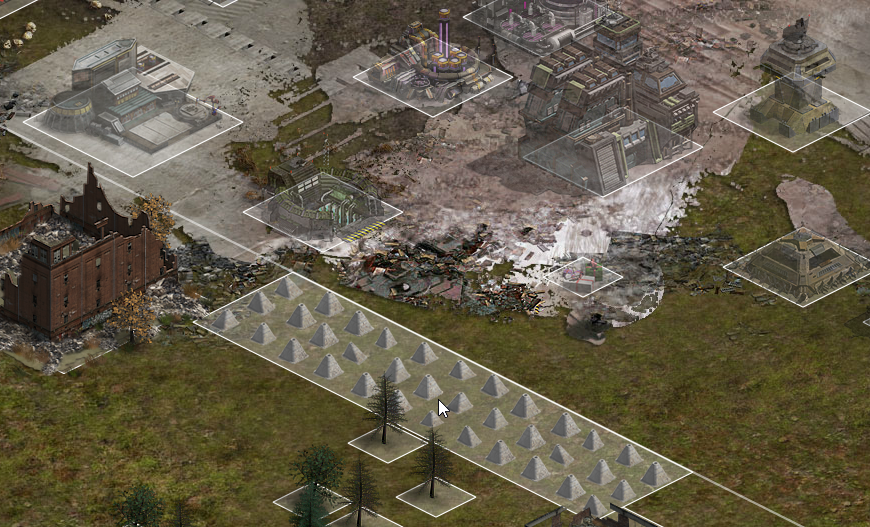
Once upgraded to level 2, obstacles also do some damage to the affected units, and you can place landmines within their footprints! Say, speaking of land mines...
Mine Factory
You Mine Factory won't be a major part of your defense, but it's definitely worth taking a look at. This building allows you to research and deploy mines that will inflict damage on invaders who stumble across them. To place a mine, click the Mine Factory and look for the Place Flag option.
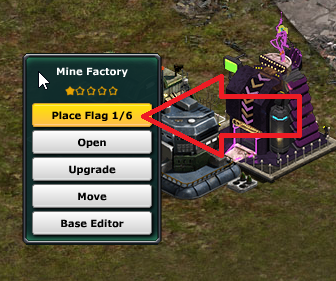
Click that button and you will be given the opportunity to place a flag wherever you'd like to deploy a landmine. Once place, the flag is red, warning us that we still have to take action--there's no landmine there yet!
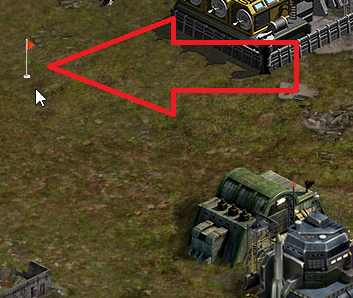
Now that we have placed a flag, let's go back to our Mine Factory. Click on it, then, click on Open, which will bring up this screen...
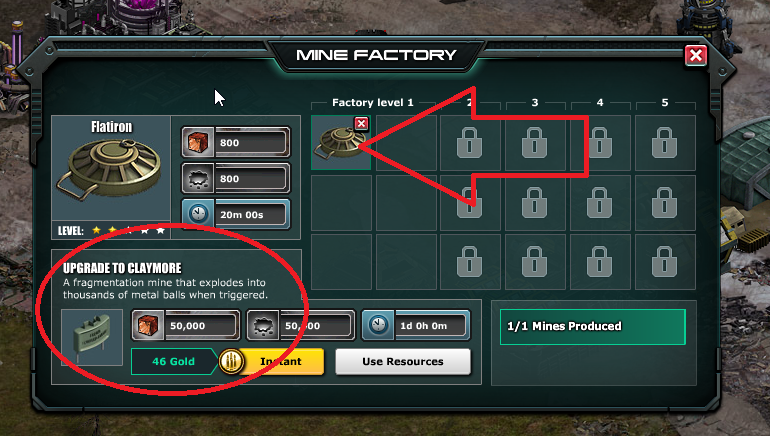
Just click on any of the open spaces to build a mine. Each of those empty spaces is represented in your base by one of those flags; you must place flags first to be able to put mines in them. (Note that this is also where you can upgrade to more powerful landmines!)
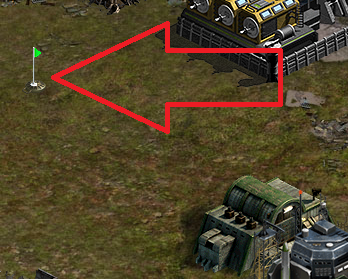
Once you have placed a mine, the flag shows up as green. Only you can see these flags. Your enemies will not be able to see them, so place them in the sneakiest, deadliest manner possible!
Drone Silos
If you have an Airfield and your Command Center is at least level 3, you can build Drone Silos. These buildings will automatically deploy fling drones who will attack invading forces.
To research and upgrade the various types of drone that can be placed in the Drone Silo, use your Tech Center. Then you must actually build the units using your Airfield. Now we will place them in a drone silo, in much the same way we'd build units and place them in Bunkers. To place drones, just click on the Drone Silo, then select the drone you want to use.
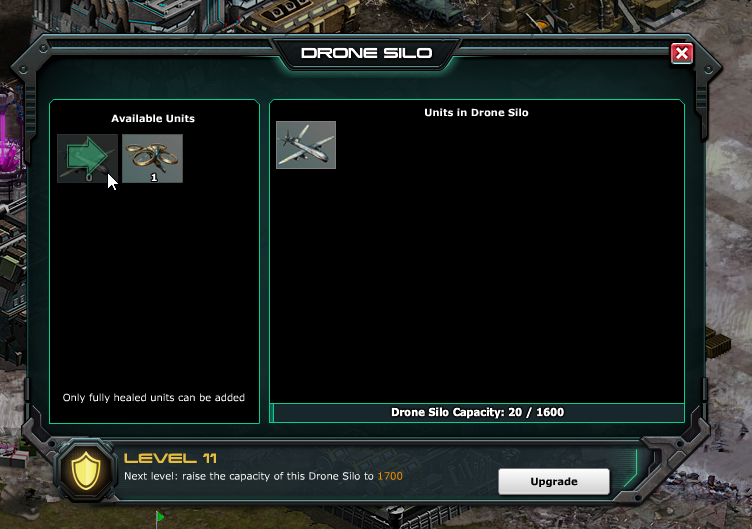
You can use as many drones as you can fit in the Drone Silo; it's capacity will increase as you level it up. Once you're happy with the drones you've placed, just close the window.
Drones cannot be controlled; they are autonomous. If a Drone Silo is destroyed, any drones it has deployed are also destroyed.
Rocket Silos
The Rocket Silo works kind of like the Drone Silo: as units come into range, it attacks the crap out of them! But instead of tiny aircraft, it uses tiny missiles. It's cute in a murdery kind of way.
You can research different types of defensive rocket in your Defense Lab. You can then click on the Rocket Silo and select the types of rockets you want to load it with. This can be switched at will; the interface for selecting and switching rocket types is very similar to every other building interface you've seen in this series, so by now, you can do it on your own. That's right--we're turning you loose now. You're prepared. You can do this.
Get to it, commander!
OK, wait--there are a few extra details about the Rocket Silo you should know. One, when the Rocket Silo has a rocket type assigned to it, but is empty, a little red rocket icon floats over the building:
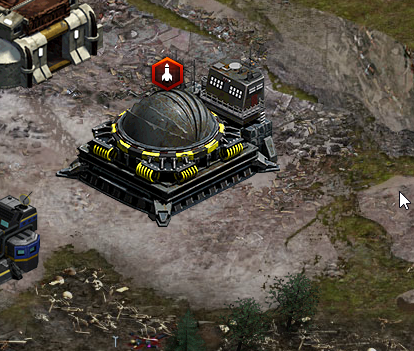
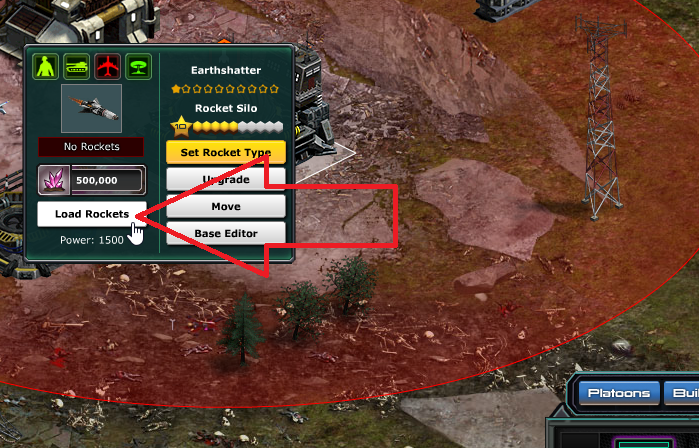
To load it with rockets, click the building and look for the Load Rockets button and it will load your Rocket Silo.
Once this is done, the quantity bar directly under the image of the rocket type you're using will show "Full," letting you know you're ready to rain destruction upon anyone who dares invade your base!
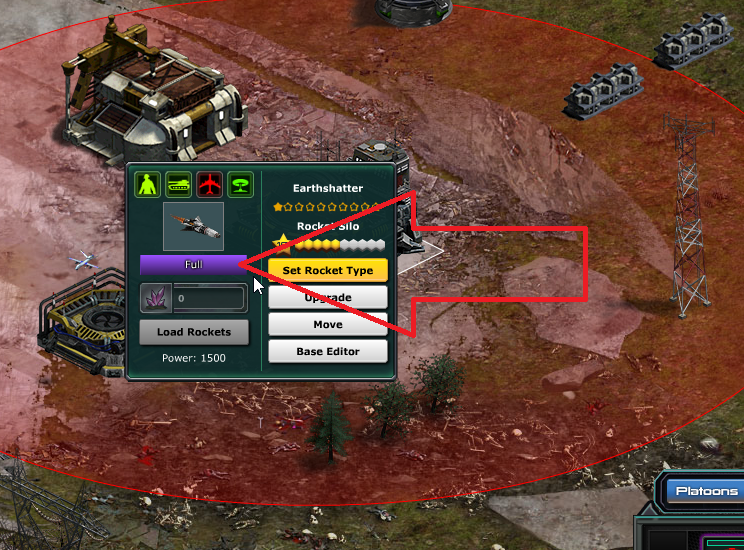
You don't have to build any units to put into your Rocket Silo like you do with your Drone Silo--this expenditure of thorium is all it takes to refill the rockets. However, your Rocket Silo does not replenish its rockets without being told to do so, so keep an eye on that quantity bar and refill your rockets as needed.
Conclusion
Look, War Commander is huge...I mean really, really huge. There are tons of options to consider, strategies to employ, and threats to evaluate. No tutorial series could ever capture the full depth and complexity of War Commander. The great thing about the game, though, is that you can learn most of it as you play. So what we have tried to do in this tutorial series is to familiarize you enough with the game that you won't struggle with basic questions in your early days--we want you out on that battlefield kicking as much ass as humanly possible, as quickly as humanly possible. Hopefully, this tutorial series has helped make that possible!
Go forth and vanquish your enemies, Commander.
They've got it coming.
